Linux 随机密钥登陆 (基于Google Authenticator )
什么是 Google Authenticator?
Google Authenticator是一个2-step验证的Google 谷歌账号保护方式。
它是这样运作的:在你的移动设备上,Google Authenticator会生成一个code,你需要输入这个code才能够对你的账号进行操作。Google Authenticator为你的设备带来了更上一个台阶的保护。
Google Authenticator可以通过QR码做自动设置调整,同时支持多个账号,当然的,也支持多种语言的服务。
这种方法虽然简单,但是却非常有效的保护了你的Google账号不被泄露。在使用前,你需要先在谷歌账号设置界面开启Google账号的2-step验证选项。如果你重视自己的谷歌账户隐私和安全,Google Authenticator是你不二的选择。
作为开源项目,Google Authenticator不仅提供从Android,IOS,BlackBerry,WP客户端,还提供了PAM模块可以用在Linux上.
安卓版下载:https://play.google.com/store/apps/details?id=com.google.android.apps.authenticator2&hl=cn
IOS版下载 :https://itunes.apple.com/cn/app/google-authenticator/id388497605?mt=8
请注意Google Authenticator是基于时间算法的,客户端和服务器时间时区最好一致.腾讯云无需做更改.
输入 date 如果看到Tue Jun 10 20:03:12 CST 2014 和本地时间一致即可.
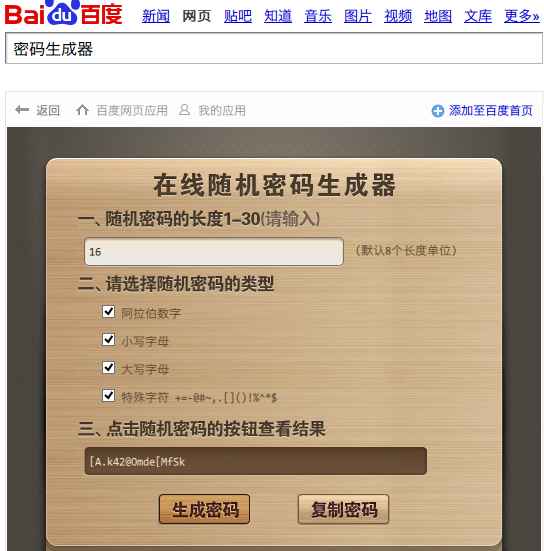
第1步: 生成复杂密码,将Linux密码加固到16位或者更高
打开百度,搜索"密码生成器",点击第一个应用,来生成一个16位或者更多的复杂密码.
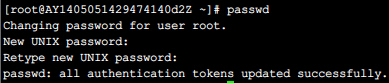
用Xshell登录服务器,执行 passwd ,然后输入2次新的加固密码即可,看到passwd: all authentication tokens updated successfully.就表示密码更改成功.
第2步:更改登陆端口
例如 要更改的端口为:12315,第2行和第4行的12315换成您自己的端口
sed -i "s/#   Port 22/Port 22/g" /etc/ssh/ssh_config
sed -i "s/Port 22/Port 12315/g" /etc/ssh/ssh_config
sed -i "s/#Port 22/Port 22/g" /etc/ssh/sshd_config
sed -i "s/Port 22/Port 12315/g" /etc/ssh/sshd_config
第3步:安装需要的组件(Centos),Ubuntu注意看下面
yum -y install wget gcc make mercurial pam-devel libpng-devel ntp gcc-c++

cd ~
wget http://fukuchi.org/works/qrencode/qrencode-3.4.3.tar.gz
tar zxf qrencode-3.4.3.tar.gz
cd qrencode-3.4.3
./configure --prefix=/usr && make && make install

cd ~
wget http://google-authenticator.googlecode.com/files/libpam-google-authenticator-1.0-source.tar.bz2
tar jxf libpam-google-authenticator-1.0-source.tar.bz2
cd libpam-google-authenticator-1.0
make && make install
注意:Ubuntu这里请用即可:
sudo apt-get -y update
sudo apt-get -y install ntp libpam-google-authenticator
第4步:生成google-authenticator文件
执行命令:
google-authenticator
所有问答窗口一律输入 y ,然后用手机上的 谷歌身份验证器(菜单-设置账户-扫描条形码) 扫描二维码.
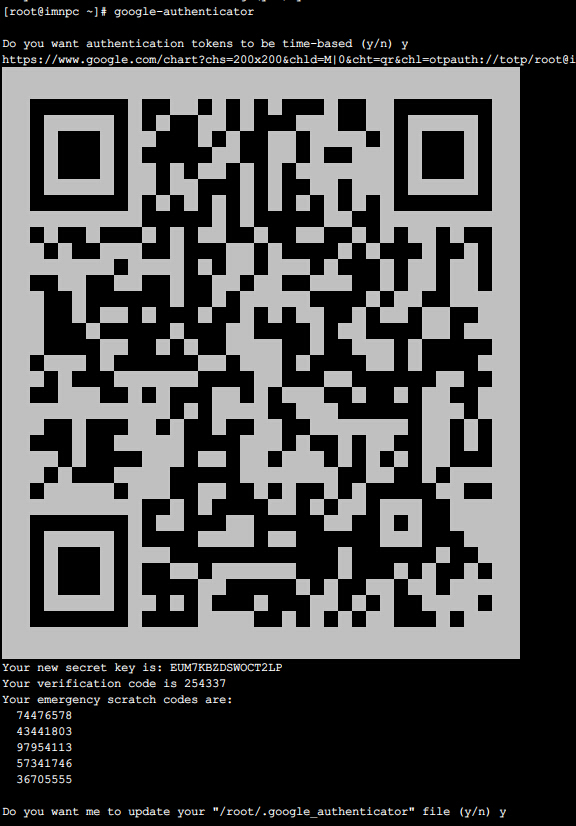

界面下方显示的部分,请记录到安全位置,里面的是备用紧急代码(在手机无效的情况下可用,每个代码只能用一次 ):
Your emergency scratch codes are:
  74476578
  43441803
  97954113
  57341746
  36705555
第5步:配置ssh应用Google Authenticator验证系统
执行SSH配置更改,重启ssh服务
sed  -i '1 a\ auth       required     pam_google_authenticator.so' /etc/pam.d/sshd

cat /etc/pam.d/sshd

sed -i "s/ChallengeResponseAuthentication no/ChallengeResponseAuthentication yes/g" /etc/ssh/ssh_config
sed -i "s/ChallengeResponseAuthentication no/ChallengeResponseAuthentication yes/g" /etc/ssh/sshd_config

cat /etc/ssh/sshd_config

service sshd restart
service ssh restart
然后新开一个窗口连接服务器,会提示输入Verification code:
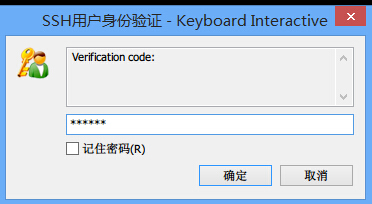
如果登陆客户端不同,可能样式如下:
[root@ca ~]# ssh root@IP地址
Verification code: [输入手机生成的验证码]
Password: :[输入密码]

Last login: Tue Jun 10 20:50:46 2014 from 124.X.X.X
这样设置以后的好处就是别人试图暴力破解的时候,因为没有手机生成的Google Authenticator验证码,无法登录服务器,无法猜解.
也可以安装第6步里面的DenyHosts,猜解超过5次就会被自动封锁。
第6步:安装DenyHosts,尝试错误登陆5次(有该用户)或者10次(无该用户)自动封锁IP一周(可选操作)
cd /usr/local/src
wget -c http://nchc.dl.sourceforge.net/project/denyhosts/denyhosts/2.6/DenyHosts-2.6.tar.gz
tar -zxvf DenyHosts-2.6.tar.gz
cd DenyHosts-2.6
python setup.py install
cd ..
rm -rf DenyHosts-2.6.tar.gz
rm -rf DenyHosts-2.6
cd /usr/share/denyhosts/
cp denyhosts.cfg-dist denyhosts.cfg
sed -i 's#DENY_THRESHOLD_ROOT = 1#DENY_THRESHOLD_ROOT = 5#' /usr/share/denyhosts/denyhosts.cfg
sed -i 's#PURGE_DENY = #PURGE_DENY = 1w#' /usr/share/denyhosts/denyhosts.cfg
cp daemon-control-dist daemon-control
chmod 700 daemon-control
./daemon-control start
cd /etc/init.d
ln -s /usr/share/denyhosts/daemon-control denyhosts
chkconfig denyhosts --add
chkconfig denyhosts on --level 2345
至此全部安装完毕,只有持有手机上的Google Authenticator验证码才可以登录,没有验证码任何人也无法登录你的服务器。

